Case Study: Converting a Video Poker Arcade Machine to Raspberry Pi
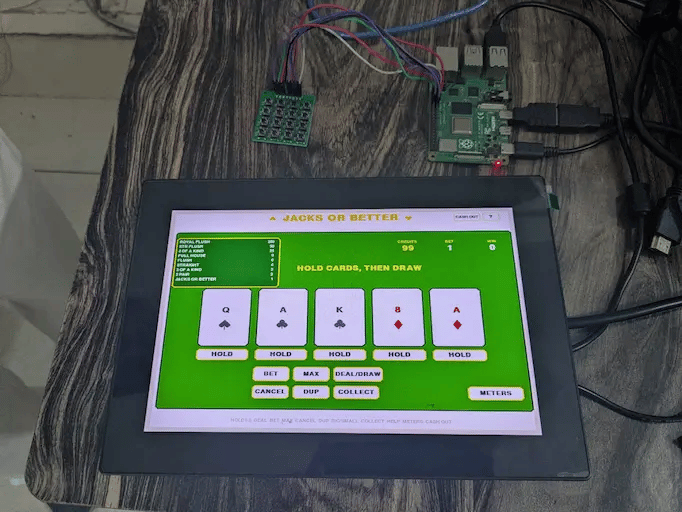
How We Converted a 1980s Video Poker Arcade Cabinet to Raspberry Pi
A client walked into our office with a 1984 video poker cabinet. Original CRT, original wiring harness, original power supply humming like it was about to give up. The machine still booted, but barely. The game ROMs were failing, replacement parts didn't exist, and the client wanted it running reliably for a retro arcade bar opening in six weeks.
They asked if we could gut it and drop in a Raspberry Pi. Short answer: yes. Longer answer: the interesting part wasn't the Pi. It was everything around it.
Why Raspberry Pi Made Sense Here
We build firmware for nRF52 and ESP32 targets all day, but this project called for something different. The client needed video output, audio, USB input handling, and a stable OS they could update remotely. A Raspberry Pi 4 with 4GB RAM handled all of it without breaking a sweat. The emulation layer (we used a custom MAME build) ran the original poker ROMs at full speed with room to spare.
For teams looking at similar retrofits, working with experienced Raspberry Pi developers saves weeks of trial and error. The board itself is cheap. The integration work is where projects live or die.
The Hardware Side
First problem: the original cabinet ran on a 19-inch CRT with a weird refresh rate. We considered keeping it for authenticity, but the tube was on its last legs and sourcing a replacement meant waiting months. We swapped in a 19-inch 4:3 LCD and built a custom mounting bracket in CAD, then printed it in PETG. The bracket had to match the original bezel curvature within about 2mm or the artwork wouldn't sit flush.
Second problem: power. The original linear power supply put out +5V, +12V, and -5V. The Pi needs 5V at 3A. We pulled the old supply entirely and dropped in a Mean Well switching unit, then added a small buck converter board for the 12V coin acceptor and lamp circuit. Total draw dropped from around 180W to 22W. The client noticed the difference on their electricity bill within a month.
Third problem: controls. The original buttons and joystick used leaf switches wired to a custom encoder board that no longer exists. We replaced it with a Zero Delay USB encoder — cheap, well-documented, and it shows up as a standard HID gamepad in Linux. No drivers needed. The coin acceptor was trickier. It outputs 12V pulses, so we ran it through an optocoupler into a GPIO pin and wrote a small Python daemon to translate pulses into keystrokes. Twenty lines of code, but it took three iterations to get the debounce timing right.
The Software Stack
We started with Raspberry Pi OS Lite and stripped it down. No desktop environment, no Bluetooth, no WiFi unless the client explicitly enabled it through a config file. Boot time went from 34 seconds to 9.
For the frontend, we used Attract-Mode. It's lightweight, handles custom themes well, and the config is plain text. The client wanted the original cabinet artwork displayed on the menu, so we scanned the side panels at 600 DPI and rebuilt the theme around them.
The emulation itself runs MAME 0.250 with a custom ROM set. We patched two of the original game ROMs because they had known bugs that caused crashes after extended play — something the original hardware masked because operators would power cycle the machines daily.
One thing we added that wasn't in the original: a graceful shutdown script tied to the cabinet's power switch. The Pi watches a GPIO pin, and when the switch flips, it runs shutdown -h now and waits for the green LED to stop blinking before cutting power. Without this, the SD card would corrupt within a few weeks of daily use. We've seen it happen on other retrofits.
What We'd Do Differently
The SD card is the weak point. We used a high-endurance A2 card, but for a machine running 12 hours a day, an SSD over USB is the better call. We've since moved to that approach on similar builds. It adds about $40 to the bill of materials and removes the most common failure mode.
We also under-estimated the audio side. The original speaker was a 4-ohm 15W unit that sounded terrible with the Pi's onboard audio. We added a small PAM8610 amplifier board and a ground loop isolator. Total cost: $12. The difference was night and day.
Timeline and Outcome
Six weeks, start to finish. Two weeks for hardware design and sourcing, two weeks for software, one week for integration and testing, one week of buffer that we mostly spent on the coin acceptor.
The machine has been running in the arcade bar for eight months now. Zero support calls. The owner updates the game list remotely through a simple web interface we built on top of Flask. They've added three more cabinets since, all using the same reference design.
A Note on Scope
This kind of project sits at an odd intersection. It's not pure embedded work — you're not writing bare-metal C for a Cortex-M4. It's not pure software either, because the mechanical fit and power design matter as much as the code. If you're planning something similar, the Pi is almost always the right starting point. Just budget your time for the boring parts: mounting brackets, power rails, and debounce logic. That's where the project actually gets done.
If you're working on a retrofit and hit a wall on the hardware side, that's usually where we get pulled in. The Pi is the easy part.
For projects like this, you can work with experienced Raspberry Pi developers who can handle the hardware conversion, software integration, and system development.
