
In this post, I’m going to show you EXACTLY how to make a web app. In fact, this is the process I’ve used, revised and perfected over the last 5 years. I’ve used this exact process, or a version of it to build over 15 apps of all shapes and sizes. For me, this is 100% the best way to build web applications.
For online startups and businesses, this four-stage system is easy to follow, thoroughly tested, and perfect for achieving an awesome web app on your own time. Broken down into straightforward steps, this process lends itself well to accomplishing a finished product in parts or small bursts of productivity.
But, before we start the tutorial, a quick recap on what we at Budibase define as a web application.
What is a web app
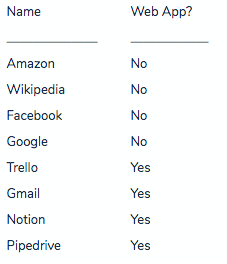
An interactive computer program, built with web technologies (ie. HTML, CSS, JavaScript), which stores (ie. in database or files) and manipulates data (CRUD), and is used by a team or single user to perform tasks over the internet.
There is a lot of confusion around what exactly is a web app. For the purpose of this post, we feel our definition above simplifies what a web app is into a digestible definition. If you’re still unsure, however, we’ve included examples of what we believe are web apps, and what are not, below:
Ok, now that we’re on the same page, let’s jump into prerequisites.
Prerequisites
To make a data-centric web app from the bottom-up, it is advantageous to understand:
- Backend language (e.g. Python, Ruby) to control how your web app works
- Web front end (HTML, CSS, Javascript) for the look and feel of your web app
- DevOps (Github, Jenkins) for deploying/hosting your web app
If you don’t have any experience with the points above, don’t worry. You have two options:
- Learn the points above. There are lots of resources online to help you. I’d recommend Codecademy.
- Use a web app builder (like Budibase). As a builder, these services will remove the need to learn a backend language. On top of that, Budibase specifically will also take care of a lot of your DevOps tasks such as hosting.
Moving on. The time has arrived to quickly dive into the 12 steps for making a web app.
Are you ready? Let’s do this!
How to make a web app in 12 steps (4 stages)
Ideation stage
-
Source an idea
-
Market research
-
Define functionality
Design stage
-
Sketch your web app
-
Plan your workflow
-
Wireframe the UI
-
Seek early validation
Development stage
-
Architect your database
-
Develop your frontend
-
Build your backend
Launch stage
-
Host your web app
-
Deploy your web app
Step 1 – Source an idea

Before making a web app, you must first understand what you intend on building, and more importantly why you are building it. The idea process for many is the toughest part.
Your idea should stem from solving someone’s problem. Ideally, your own problem.
It’s important that you choose an idea which interests you. Interest is key to fueling motivation which is crucial when making a web app. It takes effort to build web apps and it’s important you have fun during the process.
Ask yourself:
- How much time do I have to build this app?
- What am I interested in?
- What apps do I enjoy using?
- What do I like about these apps?
- How much time/money will this app save or generate for me (as a user)?
- How much will it improve my life?
If you are having a hard time finding ideas, here’s six micro saas ideas you can use to inspire you.
Step 2 – Market Research

Once you’ve chosen your idea(s), it’s important to research the market to see:
- If a similar product exists
- If a market exists
The number 1 reason startups fail, is down to the failure to achieve product-market fit. Marc Andreessen (Mosaic, Netscape) defined the term product-market fit as follows: “Product/market fit means being in a good market with a product that can satisfy that market.”
To quickly find out if a similar web app exists, use the following tools to search for your idea:
If a similar product exists, don’t worry. This can be a sign a market for your idea exists. Your future competitors have laid the groundwork, educated the market. It’s time for you to swoop in and steal the thunder.
If a similar product doesn’t exist, it’s a possibility you’ve struck lucky—you masterful innovator. 👍
On the other hand, it’s a possibility someone before has ventured down this path and hit a dead-end. 👎
Nobody wants to experience finding a dead end, so it’s important to dive deep into the market and source the wisdom of:
- Your Web App’s target market — Share your web app idea on forums related to your target market. If you know anyone who works within your target market, explain your idea to them. The more you talk and receive validation from your target market, the better.
- Google Trends — A quick search of your web app idea will reveal relating trends.
- An SEO tool — I’d recommend MOZ or Ahrefs. Google’s keyword planner will suffice. Write a list of keywords relating to your web app. If your idea is an OKR tool, use the tools to search “OKR tool”, “OKR app”, and “objectives and key results software”. If the SEO tool indicates there are lots of people searching for your keyword terms, this is a small indicator you have a target market.
- Social Media — Jump over to Twitter/Facebook groups and present your idea to your target market.
- Events — If there is a local event in your area attracting people from your target market, go to it and poke around. Share your idea and record the feedback.
After completing the above steps, you should have enough information to understand if there’s a market for your product.
If there is a market for your product, and there’s also some established competition, it’s important to research them, too. Knowing your competition is an massive advantage.
Step 3 - Define your web apps functionality

You’ve got your idea, you’ve validated the market, and it’s now time to list everything you want your app to do.
A common mistake here is to get carried away. Your web app is NOT a swiss army knife. It won’t have all the features and functionality of Salesforce and it doesn’t have to.
I repeat, don’t get carried away. The more functionality you add, the longer it will take to build your web app. Quite often, the longer a web app takes to build, the more frustration you’ll experience.
One of the most important aspects of making a web app is having fun, enjoying the ride, and celebrating the small wins. Only define functionality which solves your target markets problems.
I promise I’m not here to kill your dreams. Remember, you’re web app is a work in progress and the first goal is a simple “version 1”. It will still have cool features and delight your users, but you must keep things simple.
For direction, I’ve included a list of basic functions required for a simple CRM (Customer Relationship Manager) app:
- Users can create an account
- Users can retrieve lost passwords
- Users can change their passwords
- Users can create new contacts
- Users can upload new contacts
- Users can assign a value to contacts
- Users can write notes under contacts
- Users can label a contact as a lead, customer, or associate
- Users can filter contacts by lead, customer, or associate
- Users can view the total value of leads, customers and associates
The above list will help you define your features. Once you’re done, roll up your sleeves.
It’s time to get creative!
We’re moving from the Ideation stage, to Design stage.
Step 4 - Sketch your web app

There are multiple stages of designing a web app. The first stage is sketching.
My favorite and the quickest way is to use a notebook (with no lines) and pen/pencil. Old school! 📐
After the first three steps, you should have an idea of what your web app is, who your users are, and the features it will have.
Sketch out the wireframe of your web apps UI. It doesn’t have to be exact—this is just a sketch. When sketching, consider the following:
- Navigation
- Branding
- Forms
- Buttons
- Any other interactive elements
Sketch different versions of your web app. Consider how your web app’s functionality will affect the overall design. Annotate your sketch and outline how your app should work.
Taking notes will help you clarify and understand why you’ve designed certain elements at a later stage.
Once again, don’t get carried away here. Your sketch is for communicating and experimenting, not selling. Overcomplicating the design at this stage will only lead to frustration.
For makers short on time to work, you can also find businesses online that will help you visualize your idea in sketch form (ie. Budibase, Sketch, etc.)
After sketching your app, it’s time to move on to Step 5.
Step 5 – Plan your web app’s workflow

It’s time to put yourself in the shoes of your user. In Step 5, we’re going to plan your web app’s workflow.
Pull up all that market research you did in Step 2. Take your list of competitors and sign up to their free trials. Have a quick play around with their product. Write notes on what you thought was good and what you thought was bad. Pay particular attention to their app’s workflow (ie. how you move from task to task in their app).
After you’ve finished analyzing your competitor’s web apps, it’s time to write down different workflows for your app. Consider the following points:
- How does a user signup?
- Do they receive a verification email?
- How does a user login?
- How does a user change their password?
- How does a user navigate through the app?
- How does a user change their user settings?
- How does a user pay for the app?
- How does a user cancel their subscription?
Fill in the gaps of your workflow. Find places to improve and make note of them for later. All of a sudden, our one-page web app idea turns into a 10-page web app idea. Sweet!
Write a list of all the different pages your web application will have. Consider the different states of pages. For example, the homepage will have two states: logged in and logged out. Logged in users will see a different page than logged out users.
Step 6 – Wireframing/Prototyping Your Web Application

Ok, it’s time to turn those sketches and that new-found understanding of your web application into a wireframe/prototype.
What is wireframing/prototyping?
Wireframing is the process of designing a blueprint of your web application. Prototyping is taking wireframing a step further by adding an interactive display.
The decision is to wireframe or prototype is down to your personal preference, ultimately. For first time web app creators (or even seasoned ones), I would recommend not skipping this. Additionally, if you have the time, I’d strongly recommend prototyping, as it will make it easier to communicate your web app’s merits when seeking validation.
You can prototype/wireframe using the following tools:
- Sketch (macOS)
- InVision Studio (macOs)
- Adobe XD (macOS, Windows)
- Figma (Web, macOS, Windows, Linux)
- Balsamiq (macOS, Windows, Web)
I recommend you create a design system/style guide first. You can find inspiration at UXPin. Design systems improve design consistency, but it’s not required.
Step 7 – Seek early validation

You’ve now got a beautiful prototype which visually describes your web app. Digital high five. ✋
It’s time to show your beautiful prototype to the world. Exciting! At this stage, we want constructive feedback.
Simply asking your friends if they would use your new web app is not enough. You should start with a small number of representative users. Go to your target market’s forums, watering holes, and their places of work, and verify the problem with them. Then present your solution.
Try to build a rapport with these representatives as they could become your first customers.
I also like to use this stage to test my sales pitch—the ultimate token of validation is pre-launch sales. If people hear your pitch and are willing to buy immediately, you know you’ve got a good thing going.
Takes notes and document all feedback. The learning from these meetings will help direct the development of your MEP (Minimal Excellent Product; like MVP but better 😉).
Ok, so now you’ve got great feedback and product validation. It’s time to start building your web app.
Before we start the development stage...
Before we make our web app, I would like to share the following tips:
- Attempt to get a small section of your app fully working. What we would call a “Complete Vertical”.
- Building the smallest possible section will allow you to piece all the bits together, and iron out those creases early.
- You will get great satisfaction early by having something working, which is a great motivator.
- Create things that you know you will throw away later if it gets you something working now.
- At the start, expect things to change a lot as you learn and discover what you haven’t thought about.
- Have faith that your app will stabilize.
- Don’t be afraid to make big changes.
- Spend time learning your tools.
- You may feel like you are wasting your time, reading, or experimenting with “hello world”. Learning the correct way to do things will have a huge positive, cumulative effect on your productivity over time.
- Where possible, “go with the grain” of your tools. Realize that as soon as you step out of the normal flow/usage of your toolset, you are on your own and could be in a deep time sink. There are always exceptions to this of course!
- Don’t avoid issues that need to be fixed.
- Face your issues head on—they will never go away and will only grow if ignored.
- However, if things are still likely to change—its best to spend as little time as possible on potentially-time-sucking issues… It’s a tricky balance!
Before you move on, I would recommend you do some self-teaching about Databases and Front End/Back End process. It’ll make your life much easier going forward, and those skills will never leave you if you stay sharp. If you don’t have the drive or time to learn about these things, I strongly recommend you find a company that can help you through this process—it’s complicated and technical, and can be a bit confusing for those who haven’t dipped their toes into it just yet.
Alright, with that disclaimer out of the way, it’s time to consider databases. Exciting times! 🎉
Step 8 – Architect and build your database
So, we know roughly what our web application’s functionality, what it looks like, and the pages required. Now it’s time to determine what information we will store in our database.
What is a database?
Simply put, a database is a collection of data. Data can be stored to disk, or in memory on a server, or both. You could create a folder on your hard drive, store a few documents, and call it a database.
A Database Management System (DBMS) is a system that provides you with consistent APIs to (most commonly):
- Create, update, and delete databases
- Read and write data to databases
- Secure access to a database by providing leveled access to different areas and functions
What data you need to store and what your users need to do will determine the type of database required to run your web app.
Database types
There are many types of databases, made for many different purposes. A web app will most commonly use one of the following:
SQL (Structured Query Language)
You should use a SQL database if your data is very relational. Your data is relational if you have multiple, well defined record types that have relationships between them.
For example, a “Customer” may have many “Invoices” stored against their record. Typically, you would create a Customer table and an Invoice table—which could be linked together by “Foreign Key” columns (e.g. Customer.Id = Invoice.CustomerId).
SQL databases have an extremely powerful query language that allows you to present your data in all sorts of useful ways. They have been around for decades, are very well understood, and usually a safe choice. MySQL, PostgreSQL, and Microsoft SQLServer are some of the most common, along with many more modern offerings.
The downside of SQL databases is that you must declare all your tables and columns up front. This can create a lot of overhead to manage. If you have never used one before, you’re in for a pretty steep learning curve. However, there are plenty of learning resources available, and it’s always a very useful skill to have; worth investing the time to learn it.
Document Database
You should use a document database if your data is not very relational. Document databases store “documents”. Each record in your database is simply a big blob of structured data—often in JSON format.
If you need to store relationships between your records, you will have to write code to manage this yourself. However, many other aspects of using document databases are much simpler. Your database can be “schemaless”—meaning that you do not have to declare your records’ definitions up front, which cuts down on overhead.
Generally speaking, the bar to entry to a document database is much lower. They also tend to be much more scalable than SQL databases. They usually offer some querying capabilities, although sometimes not as powerful as SQL.
Examples of document databases are: MongoDb, CouchDb, Firebase (serverless), Dynamo Db (through Amazon Web Services). There are a ton to choose from.
Decide how to segregate your data
Each of your clients has their own, private dataset. One of the worst things that can happen to your app is for one client’s data to be seen by another client. Huge breach of security and privacy. 😨
Even if there is only a small amount of non-sensitive leaked data, and no damage is done, an event like this will massively erode trust in the security of your app.
You must craft a solid strategy for segregating your clients’ data to make sure that this never happens. Broadly speaking, you have two options: Physical Separation and Logical Separation.
Physical separation
Every one of your clients has a separate database (although could share a database server with others). This makes it much more difficult to make a mistake that leads to data leakage.
Pros:
- Most secure
- More scalable
Cons:
- Managing, maintaining and upgrading is more complex
- Querying all your clients’ data together is more difficult
For example, listing all Invoices in a database will only return Invoices for one of your clients. In order to get another Client’s invoices, you need to connect to another database. Since each of your client’s data is in its own database, you can easily spread them all across many database servers, without the need for “sharding”. Your app will be much easier to scale this way.
The code you will need to write:
- When creating a new client, you need to create a new database and populate it with any seed data.
- You need to keep a record somewhere of all your clients, and how to connect to each client’s database.
- If you need to upgrade your database (e.g. add a new table), you need to code to upgrade each separately.
- If you need to query all your client’s data into one, you need to pull the data out of each and aggregate it.
Logical separation
All of your clients are stored in one giant database. Every time you need to get data for a single client, you must remember to include a filter for the client. With this kind of separation, you have to be very specific, since it’s just one big database (e.g. ‘select’ from customers where customerClientId = 1234”).
Pros:
- Easier to get started
- Easier to maintain and upgrade
- Can easily query all your clients’ data with one query
Cons:
- Easy to make a mistake that will result in a data breach
- More difficult to scale
You only have one database to manage, which is both good and bad. Setting this up and connecting to your database is easy. Your speed to market increases.
When you need to upgrade your database, you can do so with a few clicks, or by typing a few commands. It’s very easy to add new features.
As you gain more users, your database will grow to millions of rows. Put some effort into how your database handles this extra volume and load. You will have to start tuning your queries to better fit this massive volume of rows.
When you’re under pressure, it is so easy to forget to include that “where clientId = 1234” filter.
Doing so could result in a business ending data breach, so be mindful when querying.
Ensure your database is secured
You should look into best practices for securing your particular database. Some databases come with a default administrator login, which people often forget to change. This could leave your data open to the world if some enterprising person gets curious about your data.
From the start, you should create a login with “Just Enough” access. If your app only reads and writes data, then it should authenticate to your database using a login with only Data Reading and Writing access.
Step 9 - Build the frontend

Note: In reality, you will build your backend and frontend at the same time. But for this post, we’ll keep it simple. Frontend first.
What do we mean by the frontend?
The Frontend is the visual element of your web application. It defines what you see and interact with. The frontend is developed with HTML, CSS, and JavaScript.
If you’re using server pages, getting started is super easy. Your backend framework is all set up and ready to start building. This is where the huge benefit lies with server pages.
With a Single Page Application, it’s a little trickier. Follow the tips below to navigate creating frontend for a SPA:
First, you need to set up your development environment. The components of this will be:
- A code editor, such as VS Code, Sublime Text
- A compilation, and packaging framework:
- A frontend framework (strictly not necessary, but highly advised unless you are an experienced frontend developer): 4. React 5. Ember 6. Vue 7. Svelte 8. The list is endless!
- Configuring your packaging tool to talk to your backend—which is most likely running on a different port on localhost. Usually, this is done using Node’s HTTP proxy. Most packaging solutions have this option built-in, or available as plugins. This point commonly gets people stuck, and may need a diagram. Remember: if you write your backend API in C Sharp (for example), at dev time, you will be running it on a local web server, through your code editor (i.e. your frontend and backend are running on two different web servers, in dev). However, in production, your frontend should (probably) be running on the SAME web server as your backend—mainly because you want them to run under the same domain.
This means a few things: 9. At dev time, your frontend should make API requests to its own (Nodejs server— e.g. Webpack dev server). This Nodejs server should then proxy all “/api” request to your backend server. 10. When building for production, you need to get your compiled frontend files into your backend server, so they can be served as static files. You can copy and paste the files in when you deploy, but you will want to set up some sort of script to do this.
There is always a significant time required to set up your dev environment for a SPA. There are plenty of boilerplate templates out there for your frameworks of choice. However, I have never written an app that has not eventually needed some custom code on top of the boilerplate.
Still, I always choose a SPA because:
- The end product for a web app is a much more usable application.
- When you are up and running with your dev environment, I find SPAs much more productive to work with—which is more likely to do with the capabilities of modern javascript frameworks more than anything else.
- Writing a SPA is really the only way to make a Progressive Web Application.
You should now have a better idea of how to setup your frontend, and define the look and feel of your web app. In most cases I build the frontend and backend together.
Moving on to the backend!
Step 10 - Build your backend

What do we mean by the backend?
The backend is typically what manages your data. This refers to databases, servers, and everything the user can’t see within a web application.
Building your backend is one of the toughest parts of web app development. If you feel overwhelmed, a tool like Budibase can take away many of the complexities—including the following tasks.
If you feel confident, continue on.
When building your web app, you need to choose between:
- Server Pages (Multiple Page Application)
- Single Page Application (SPA)
“But isn’t this the frontend?” I hear you say. Yes! But your choice will affect how you develop your backend.
The primary jobs of the backend will be to:
- Provide HTTP endpoints for your frontend, which allow it to operate on your data. As in, Create, Read, Update and Delete records (“CRUD”).
- Authenticate users. Verify they are who they say they are; AKA log them in.
- Authorization. When a logged in user makes a request, the backend will determine whether they are allowed (authorized) to perform the requested action.
- Serve the frontend.
If you have chosen Server Pages, your backend will also be generating your frontend and serving it to your user.
With a single page app, the backend will simply serve your static frontend files (i.e. your “Single Page” and it’s related assets).
When choosing your backend:
- Go with what’s familiar.
- Try Budibase!
- Server Pages/SPA should inform your decision of framework choices within your chosen language. For example, a SPA will only require an API-only framework. Server pages need their own framework.
Login/User & Session Management:
- How will users authenticate?
- Username and password?
- Open ID (i.e. sign in as Google, FB, etc)
- Be sure to read up on security best practices. I highly recommend: OWASP
- What user levels will you create in the system?
Environments. You will usually need to create multiple environments. For example:
- Testing - for all the latest development features.
- Beta - to give early releases to clients.
- Production - your live system.
Step 11 - Host your web application

What is hosting?
Hosting involves running your web app on a particular server. When using Budibase, this step can be automated with Budibase hosting. With Budibase, you are still required to buy a domain.
If you are not using Budibase to host your web application, follow these quick steps:
- Buy a domain (from places like Namecheap).
- Buy/Setup an SSL certificate (from places like Let’s Encrypt).
- Choose a cloud provider:
- Amazon
- MS Azure
- Google Cloud Platform
- Lower cost: Digital Ocean/Linode if you are happy managing your own VMs
- Zeit Now, Heroku, Firebase are interesting alternatives that aim to be faster and easier to get things done—you should read about what they offer, if that’s your jam.
Choosing one of these hosting options will almost certainly provide you with everything you need. They have ample documentation and community support, and are generally reliable options.
Step 12 - Deploy your web app

You’ve sourced your idea, validated it, designed and developed your web app, and chosen your hosting provider.
You’re now at the last step. Well done! 🎉
The deployment step includes is how your web application gets from your source control on your computer to your cloud hosting from Step 11.
How does your application get from Source Control/your computer to your cloud hosting provider?
The following development tools provide continuous integration and will help you with deploying your web app to your cloud hosting:
There are a ton of options. To start with, you can also just deploy directly from your computer, of course.
And... that’s it. You have made a web application. Well done. You should take some time to celebrate this achievement. You’re the proud owner of a new web app. 😄

I hope the IndieHacker community has enjoyed this tutorial. I will continue to update this tutorial and refine the process of how to make a web app.
From the team at Budibase, thank you for sticking with it.
If you are interested in Budibase, please sign up on our website and join the community. The builder will be open source, and you can benefit from automated hosting and a user management platform.
Awesome, right?
Thanks for tuning in and good luck on your web app journeys. Leave a comment below about your journey from baby idea to full-fledged web app below! And share the article if you think others could learn from this process too!
Fantastic guide for beginners! If anyone is looking for a community to discuss app projects or find solutions, I recommend checking out this group: App Projects & Solutions
Where can i find this group!?
Hi MadebyZ, Here is the App Projects and Solutions Group: https://www.indiehackers.com/group/app-projects-solutions
This is a great resource for me, a guy who's just starting out in web development. Bookmarked! 🔖
That's amazing Samuel. We hope it helps you create awesome web apps.
Cool, thank you for that!
@Budibase 👌