How to Order Custom DTF Transfers: File Setup to Final Delivery
Introduction
If you're in the custom apparel printing business, Exploring how to order custom DTF transfers the right way can save you time, money, and a lot of frustration. Whether you're a clothing brand, small business, or print-on-demand seller, getting high-quality prints starts long before the heat press turns on.
Many people rush the process and end up with blurry designs, wrong sizes, or unexpected delays. The good news? Ordering custom DTF transfers is actually simple when you follow the right steps.
In this guide, we’ll walk you through how to order custom DTF transfers from file setup to final delivery, so your prints come out vibrant, durable, and ready to impress.
Key Takeaways
Use high-resolution PNG files (300 DPI) for crisp, vibrant prints.
Set your design to the correct size for each garment type (chest, sleeve, back).
Choose the right quantity — bulk for cost savings, small runs for testing or sample orders.
Always review your artwork for spelling, color, and alignment before uploading.
What Are DTF Transfers?
DTF stands for direct to film printing, a modern printing method where your design is printed onto a special film and then transferred onto fabric using heat and pressure.
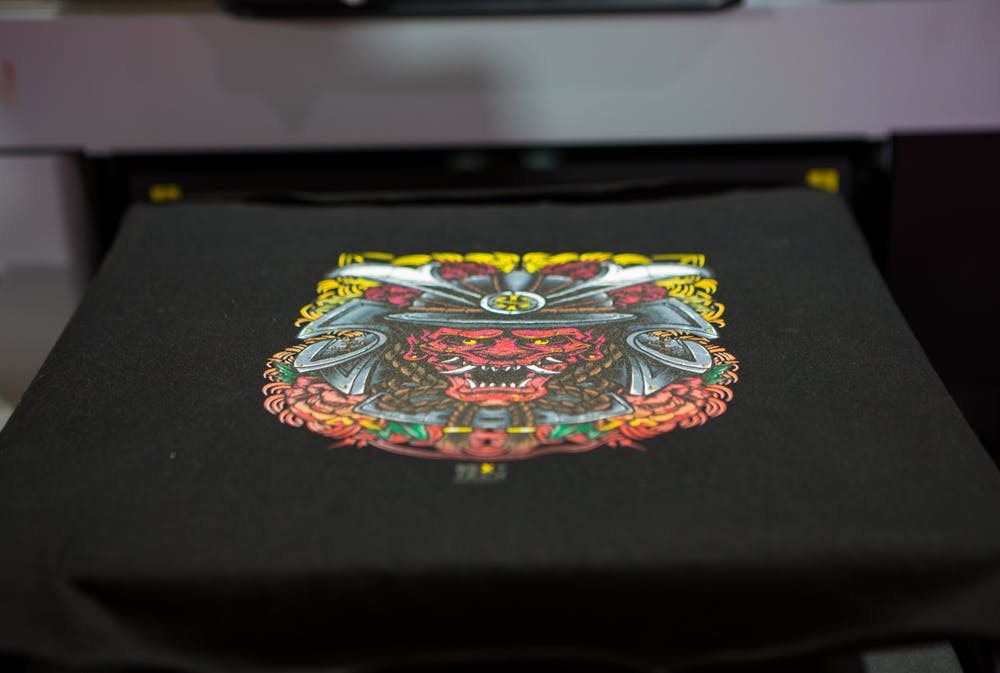
Unlike Custom DTG printing and other methods, custom DTF transfers work on a wide range of materials, including cotton, polyester, and blends. This flexibility is one of the biggest benefits of DTF printing, especially for brands that use different garment types.
Because of its durability, stretch resistance, and bright colors, many businesses now prefer working with a professional DTF printing company for their apparel decoration needs.
Why Choose DTF Printing for Custom Apparel?
Before diving deeper into how to order custom DTF transfers, it helps to understand why this method is becoming so popular.
Here’s why brands love DTF custom transfers:
Works on light and dark fabrics
Produces sharp, vibrant colors
Holds up well after multiple washes
Great for small orders and bulk production
Ideal for DTF print on demand businesses
When comparing DTF printing pros and cons, the pros clearly stand out. The prints are flexible, long-lasting, and suitable for detailed designs. The only thing you need to get right is proper file setup and application — which we’ll cover next.
Step 1 – Prepare Your Artwork File Correctly
The quality of your final print depends heavily on your design file. No matter how advanced a DTF printing company is, they can only print what you provide. That’s why the first step in how to order custom DTF transfers is making sure your artwork is set up properly.
Getting this step right ensures your custom DTF transfers look sharp, colorful, and professional.
a):- Use High-Resolution Designs
Always use artwork that is at least 300 DPI (dots per inch). This resolution ensures your design prints clearly without looking blurry or pixelated.
Low-resolution images may look fine on a phone screen, but when printed through direct to film printing, every detail becomes visible — including flaws. Blurry artwork can ruin the final result and may even increase your DTF printing cost if corrections are needed.
Pro tip: If you zoom into your design and it looks fuzzy, it’s not ready for print.
b):- Choose the Right File Format
File format matters a lot when learning how to order custom DTF transfers.
A transparent PNG file is the best choice because:
It keeps the background invisible
It preserves design edges
It ensures only your artwork gets printed
Avoid JPG files with solid backgrounds. These often print unwanted boxes or edges around your design, which can make your DTF custom transfers look unprofessional.
c):- Set the Correct Size
You should already have your design precisely sized for printing. For example, a left chest logo should be much smaller than a full back print.
Resizing after upload can reduce quality and delay production. It can also affect DTF printing cost, especially if adjustments require reformatting.
When preparing custom DTF transfers, always double-check:
Width and height in inches
Placement intention (chest, back, sleeve, etc.)
This step alone makes a huge difference in getting perfect results when figuring out how to order custom DTF transfers.
Step 2 – Select the Right Transfer Size and Quantity
Once your artwork is ready, the next step in how to order custom DTF transfers is picking the right size and quantity. Choosing carefully ensures your prints look great and your DTF printing cost stays reasonable.
a):- Choosing Sizes for Different Garments
Different garments need different print sizes:
Chest prints: Small logos or designs work best on the left or right chest. Perfect for subtle branding.
Sleeve prints: Ideal for adding extra details like team names or small graphics.
Back prints: Full-size designs or bold graphics look great on the back, making your apparel stand out.
Matching your design size to the garment ensures your custom DTF transfers look professional and proportionate.
b):- Ordering in Bulk vs Small Quantities
When learning how to order custom DTF transfers, consider how many you need:
Bulk orders: Cost-effective and ideal for brands or events. Ordering in bulk reduces the price per piece.
Small quantities: Great for testing your design or limited runs. Perfect for DTF print on demand sellers.
Knowing the right size and quantity helps avoid wasted prints and keeps your orders efficient.
Step 3 – Upload Your Design and Place Your Order
After selecting size and quantity, it’s time to submit your design and place your order
a):- Double-Check Your Design Before Uploading
Before hitting “submit,” check for:
Correct spelling
Accurate colors
Proper alignment
Even small mistakes can impact your custom DTF transfers and delay production. Always preview your file to avoid unnecessary corrections.
b):- Add Special Instructions (If Needed)
If your order has specific requirements, make sure to include them:
Custom sizing for unusual designs
Gang sheets if printing multiple designs on one sheet
Clear instructions help your DTF printing company produce exactly what you need.
Step 4 – Understand Pricing and Turnaround Time
Knowing what affects costs and delivery is important when figuring out to order custom DTF transfers.
What Affects the Price of Custom DTF Transfers
Pricing depends on:
Size: Larger prints cost more
Quantity: More prints can reduce per-unit cost
Number of designs: Multiple designs may increase production time and cost
Understanding these factors helps you plan your budget and avoid surprises in DTF printing cost.
Production and Shipping Time
Most DTF printing services near me offer:
Standard turnaround: Usually a few business days
Rush options: For urgent orders, some companies provide faster delivery
Planning ahead ensures your custom DTF transfers arrive when you need them.
Step 5 – Receiving and Applying Your DTF Transfers
Once your order is complete, your custom DTF transfers are ready for use. Here’s what to expect.
How Transfers Are Delivered
Your DTF custom transfers come in a ready-to-press format, which means no extra prep work is needed before applying them to garments.
Basic Heat Press Instructions
To achieve the best results:
Temperature: Usually around 300–320°F
Pressure: Medium to firm, depending on the fabric
Peeling method: Follow instructions for hot or cold peel
Proper application ensures your direct to film printing results are vibrant, durable, and professional.
Common Mistakes to Avoid When Ordering Custom DTF Transfers
Even if you know how to order custom DTF transfers, beginners often make mistakes that affect print quality. Avoid these to save time, money, and frustration:
Low-quality files: Blurry or low-resolution designs print poorly. Always use 300 DPI PNG files for crisp, vibrant transfers.
Wrong sizing: Designs that don’t match the garment can look awkward. Double-check dimensions for chest, sleeve, or back prints.
Skipping the artwork review: Check spelling, colors, and alignment before uploading to ensure your custom DTF transfers come out perfect.
Ignoring special instructions: Clearly mention gang sheets, multiple designs, or custom sizing to avoid production errors.
By avoiding these mistakes, your custom DTF transfers will look professional, vibrant, and ready to impress.
Also Read: How to Start a DTF Printing Business in 2026: From Setup to Success
FAQ’s
Q1: What file type is best for custom DTF transfers?
Ans: Always use a transparent PNG at 300 DPI. Avoid JPG files with backgrounds to ensure clean, precise prints.
Q2: How long does it take to receive my order?
Ans: Most orders are completed within a few business days. Rush options are available for urgent needs.
Q3: Can I order just one transfer?
Ans: Yes! Single orders are perfect for testing designs or small projects.
Q4: Do you offer help with design setup?
Ans: Absolutely. At Aesthetic Bk, we guide you through file preparation so your custom DTF transfers are ready to print perfectly.
Conclusion
Exploring how to order custom DTF transfers doesn’t have to be complicated. By preparing high-resolution artwork, choosing the right sizes, checking your designs, and working with a reliable DTF printing company like Aesthetic Bk, you’ll get vibrant, long-lasting transfers every time.
Whether you’re a small brand, a print-on-demand seller, or ordering in bulk, following these steps ensures professional results and a smooth, stress-free process. Start your order today and bring your custom apparel designs to life with ease.

