How to Turn a Photo into a 3D Model: A Practical Guide
You can turn a photo into a 3D model using modern AI tools right from your browser. These services use neural networks to interpret your image and generate a textured, three-dimensional mesh. You upload a picture, wait a minute or two, and download a model ready for tools like Blender, Unity, or your 3D printer's slicer.
That doesn't mean the process is magic. AI generation is not photogrammetry: it interprets the visible parts of an object and predicts what the unseen side probably looks like. The front side of your model will often match the image quite closely, but the back relies on inference and can be less accurate. Success depends on picking a tool that fits your project, preparing your image well, and inspecting the result before you export it.
This article walks through the complete workflow: how to convert an image step by step, how popular tools compare, which export formats suit different uses, and what to do when things go wrong.
What Is Photo to 3D Model Conversion?
Photo-to-3D conversion is the process of turning a 2D image into a digital 3D model, typically using AI-powered software. The tool analyzes the objects in your photo and reconstructs their shape, depth, and texture into a mesh you can use in 3D applications. Two main approaches exist: AI-based tools (like Meshy) use deep learning to generate the model from a photo or a few photos, while photogrammetry software stitches together dozens or hundreds of overlapping photographs to create a highly detailed model for real-world objects.
AI-based conversion is fast and requires no 3D modeling experience, but it is a generative process. According to independent analyses, AI image-to-3D tools achieve impressive visual and geometric accuracy on visible surfaces, but the products are not true digital twins and may need some manual refinement. Some sources report that AI tools can achieve 80-95% shape accuracy on the front-facing side of simple objects, while the estimated back side can be 50-70% accurate. This means you should treat AI generation as a fast way to create concepts, prototypes, or placeholders, not an automatic replacement for rigorous 3D modeling.
The following sections cover a practical workflow, tool comparison, quality factors, and troubleshooting steps.
Step-by-Step: How to Convert a Photo to a 3D Model
The general process looks like this: choose a tool, prepare your image, generate the model, inspect it, and export it. Here's a detailed guide.
Step 1: Choose a tool and create an account (if needed)
Most AI 3D generators are browser-based. You don't need a powerful PC or specialized software. Some tools, like Luma AI, work with just a sign-up. Others, like Meshy, offer a limited free tier, so you can test the technology without spending anything. For example, you can turn a photo into a 3D model with Meshy, which uses a straightforward upload-and-generate interface.
Step 2: Prepare your image
For the best results, use a high-resolution image (at least 512x512 pixels) with a clear, single subject. A clean background with even lighting helps the AI distinguish the object. Blurry or cluttered images confuse the model, leading to poorer output. Some tools allow multiple images for multi-view input, which can improve accuracy. Using multiple angles can help the AI reconstruct the back and sides more accurately.
Step 3: Upload the image and adjust settings
Upload your prepared image. Some tools offer settings for quality level, mesh detail, or generation speed. Higher settings usually produce more detailed models but take longer and may consume more credits.
Step 4: Generate the model
Click the generate button and wait. Typical generation times range from 10 seconds to a few minutes, depending on the tool and complexity. Free versions may have longer queues.
Step 5: Inspect the model
Once generated, rotate the model in the 3D viewer. Check the front, back, sides, and texture. Look for issues like holes, merged parts, or distorted geometry. This is a critical step before you export. AI tools often need several attempts or some manual cleanup.
Step 6: Export in the appropriate format
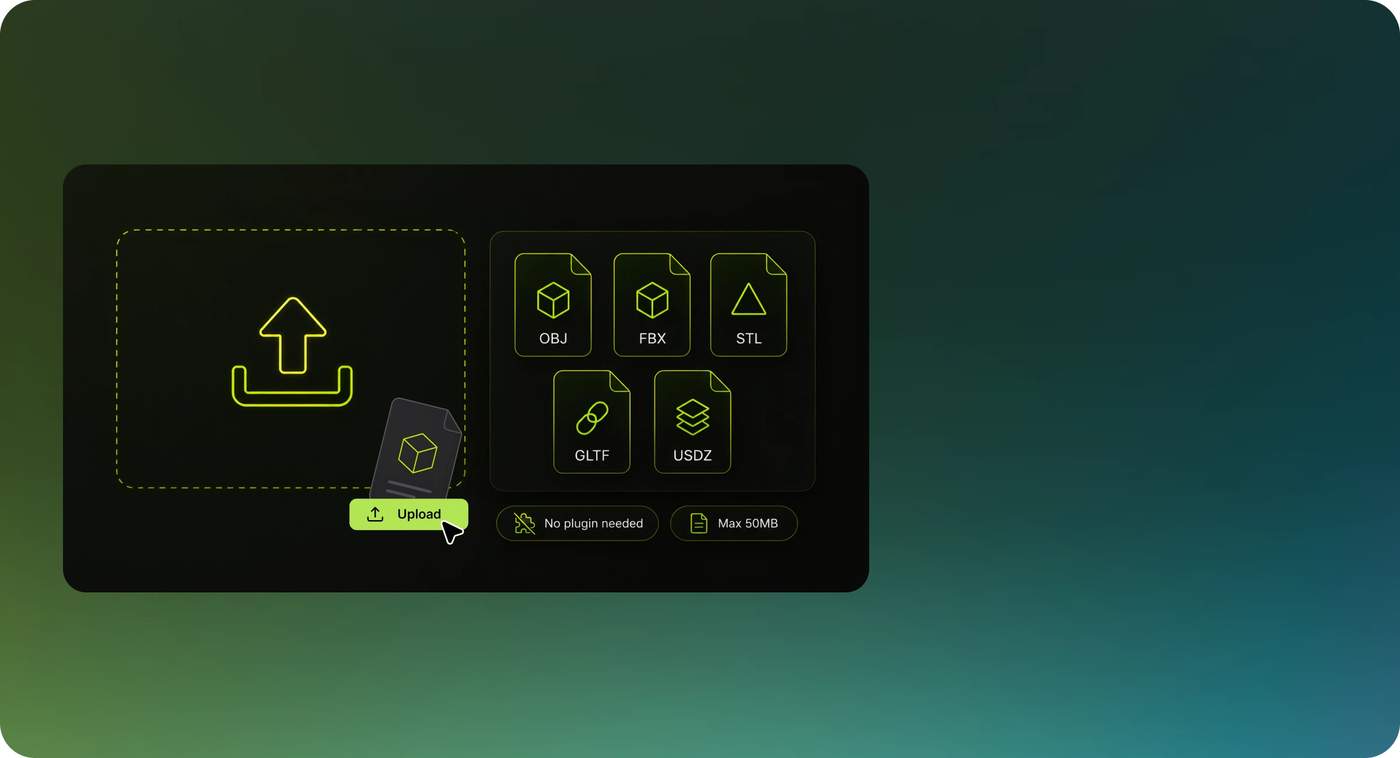
Download the model in a format that matches your workflow. Most tools export common formats like GLB, OBJ, STL, FBX, and others. For 3D printing, use STL; for web or AR, use GLB; for games or animation, use FBX. See the export format section later in this article for details.
Step 7: Post-process if needed
Often, AI-generated models require some post-processing. Use a tool like Blender to repair the mesh, optimize the texture, or adjust the scale. Some tools include a remesh feature to fix UV coordinates and improve topology.
Photo-to-3D Methods Compared
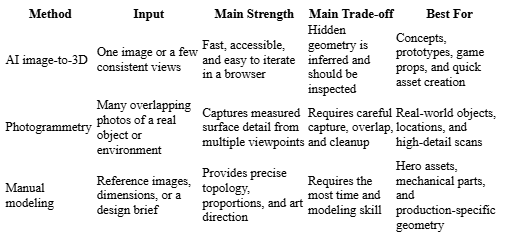
There are three practical routes from photos to 3D: AI generation, photogrammetry, and manual modeling. They solve different problems, so the best choice depends on whether you prioritize speed, measured accuracy, or complete control.
How to choose a method
Choose AI generation when you need a usable starting point quickly. Meshy is particularly useful when browser access, multi-view input, AI Texturing, and flexible exports matter. Choose photogrammetry when the goal is to reconstruct a real subject from many photographs, and choose manual modeling when exact dimensions, topology, or art direction are non-negotiable. A hybrid workflow can also work well: generate or scan a base model, then refine it manually.
Why Photo Quality Matters: Accuracy and Limitations
AI image-to-3D tools are impressive, but they have clear limitations. The accuracy of the model depends heavily on your input quality. Independent testing shows that the front side of an object can match the original image quite well (around 80-95% shape accuracy), while the back side, which the AI has to estimate, is less reliable (often 50-70%). Textures might look good for the visible parts but can be partially degraded on the rear. If you're after a model that matches a real object closely, more precise methods like photogrammetry are better, but they work best on large environments, not small objectsFactors that affect accuracy
Image quality: Low-resolution images lead to coarse geometry and missing details.
Subject complexity: Simple objects with clear silhouettes work best. Complex scenes, transparent or reflective materials, and thin structures can confuse the AI.
Single vs. multi-view: Using multiple images from different angles dramatically improves geometry, especially for hidden parts.
Post-processing: Almost all generated models benefit from manual cleanup in DCC tools like Blender to fix imperfections.
The accuracy isn't guaranteed, and different tools have different strengths. You'll get the best results if you use them as an idea visualization step before final modeling.
How to Photograph Objects for Best 3D Results
Quality input images result in more accurate models. Follow these guidelines before you start generating. Regardless of the tool you choose, these tips will significantly impact your results.
Based on best practices from Zakeke's photogrammetry guide and a 2024 peer-reviewed study on camera settings for 3D reconstruction.
Checklist
Use soft, diffused lighting (cloudy day or softbox). Avoid direct sunlight and harsh shadows that hide detail.
Place the object on a neutral background, ideally light grey, to create high contrast with the subject.
Set your camera to high resolution (minimum 30MP optimal), low ISO (100-200), and a mid-range aperture (f/8-f/14) for a deep depth of field.
Use a tripod and stable platform to keep the angle consistent.
Capture multiple angles: for a full 360° capture, shoot 3 loops at 10°, 30°, and 50° from horizontal, taking a photo every 10°. At minimum, capture front, back, left, and right views.
Avoid reflective or transparent objects. If you need to scan glass or shiny plastic, spray with matte spray to reduce reflections.
Keep the object clean and free of dust or fingerprints.
Export Formats: Which One Should You Choose?
Your final output format is just as important as generation. Each format has a specific purpose and limitations. A good rule: pick the form based on your target workflow (printing, web, game engine).
Based on format guides from Meshy, JLC3DP, and Xometry.
Comparison of Common Export Formats
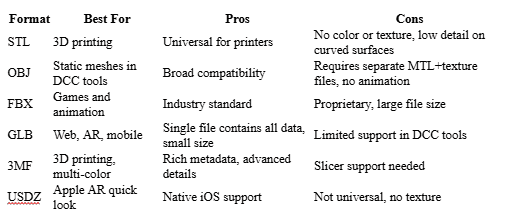
Note: Not all tools export all formats; check each tool's current capabilities.
Choose STL for 3D printing, GLB for web/AR/VR (especially if you use Three.js, RealityKit), OBJ for importing into Photoshop/Illustrator, FBX for complex rigs/animations in Unreal/Unity, and 3MF if you need print details. Always test in your exact target app.
Troubleshooting Common Issues
Most problems in AI photo-to-3D stem from messy input. If the generation fails, often a network error. If the model looks blurry or broken, the image might not be ideal or the AI couldn't interpret the object. These steps cover the common fixes.
Poor generation quality
Use a better image: Higher resolution, clean background, and well-lit help.
Enable higher settings: In tools like Meshy, select a higher quality setting if available.
Try multi-view: Give the AI more angles.
Use the remesh tool: some tools can smooth and fix topology after initial generation.
Manually check the mesh: In Blender, use the remesh modifier or a decimate modifier to clean up the mesh.
Generation failure
Check your internet: Most tools need a stable connection; ensure you have at least 5 Mbps.
File size: Keep input images under 50 MB and use supported formats (PNG, JPG, WEBP) as documented by the tool.
Server load: Wait 5-10 minutes and retry, or use off-peak hours.
Update WebGL: enable WebGL in your browser and update your graphics driver.
Texture issues
Use AI Texturing: Meshy's AI Texturing supports texture resolution up to 8K, helping improve material detail after generation.
Use a remesh: some generators include a remesh feature to unwrap UVs, which fixes texture distortion.
Import into Blender: texturize/UV correct manually.
Mesh repair essentials
Non-manifold edges: run the model through tools like Blender's 'Mesh Analysis' to find issues. Use space bar to clear up helpers.
Flipped normals: use Blender's 'Recalculate Normals' function.
Denseness: AI models tend to have huge polygon counts, so no LOD. Use Decimate modifier to bring the count to 30%.
Final Thoughts
Turning a photo into a 3D model is quick and requires no technical expertise, thanks to browser-based AI services. For concept art, pre-viz, or simple hobby projects, these tools are indispensable. They get you a workable mesh in minutes. Capture quality images, check them closely, and clean them up in external software when detail is needed. Even with the caveat that the output is ideal for drafts rather than final production, the time savings are considerable. Pick your tool based on budget and end goal, and be prepared to iterate.
Test the free tier of any tool, learn the photo-taking tips above, and you'll be generating usable 3D models.
Frequently Asked Questions
Can one photo be turned into a 3D model?
Yes. An AI image-to-3D tool can infer a complete model from one clear image, although hidden surfaces are predicted rather than directly observed.
Is AI generation or photogrammetry better?
AI generation is faster and easier for concepts and prototypes. Photogrammetry is better when you can capture many overlapping photos and need a closer reconstruction of a real subject.
What kind of photo produces the best result?
Use a sharp, well-lit image with a clean background, a complete silhouette, and minimal glare. Consistent views from several angles can improve hidden geometry.
Which file format should I export?
Use GLB for web and AR, FBX for game engines and animation, OBJ for broad static-mesh compatibility, and STL or 3MF for 3D printing.

