How to Vectorize an Image for Logos, Prints, and Branding
Understanding Vector Graphics and Why They Matter
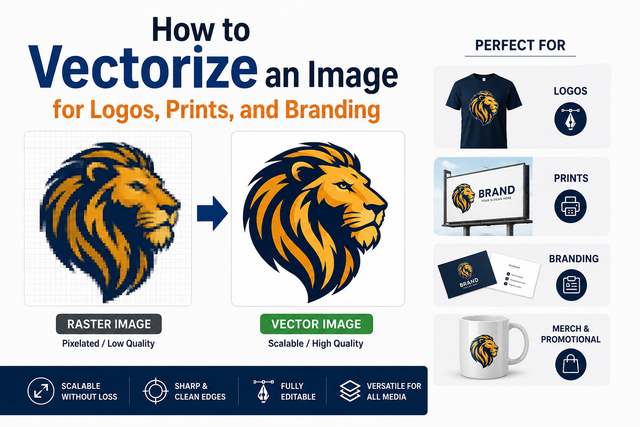
In modern design, clarity and scalability are two of the most important factors that define professional quality visuals. This is where vector graphics come in. Unlike raster images made of pixels, vector graphics are built using mathematical paths, which allow them to scale infinitely without losing quality. Whether you are designing a small business logo or preparing artwork for a billboard, vectors ensure your design stays sharp at any size.
Many designers start with a standard image file, but quickly realize the limitations when resizing becomes necessary. A pixel-based image becomes blurry or pixelated when enlarged. To avoid this issue, professionals often choose to vectorize an image so that it can be used across multiple platforms without quality loss. This process transforms a flat image into a flexible design asset suitable for branding, printing, and digital use.
Understanding this difference is the foundation of professional design work. Once you grasp how vector graphics function, you can make smarter decisions about how your visuals are created and used.
When You Should Vectorize an Image
Not every image needs to be converted into a vector format, but certain scenarios make it essential. If you are working on branding materials, packaging, promotional items, or large-scale prints, vector conversion becomes a necessity rather than a choice.
You should consider converting when:
• You need to scale a logo for different sizes
• You want sharp print results on banners or posters
• You are redesigning or modernizing old artwork
• You need editable design elements for marketing use
• You are preparing files for professional printing services
In these situations, the ability to vectorize image files ensures consistency and quality across all platforms. Businesses especially rely on vector graphics because their logos must appear identical on everything from business cards to digital advertisements.
Ignoring this step can lead to inconsistent branding and low-quality visuals, which can negatively affect how a brand is perceived.
Preparing Your Image Before Conversion
Before you begin the conversion process, preparation plays a key role in achieving clean results. A well-prepared image will always produce a more accurate vector output.
Start by selecting a high-resolution image. Even though vector graphics are resolution-independent, the tracing process works better when the original image is clear. Avoid blurry, overly compressed, or heavily filtered images.
Next, simplify your design. If the image contains too many gradients, shadows, or complex textures, it may be harder to convert accurately. Clean edges and strong contrast make the vectorization process smoother.
Here are a few preparation tips:
• Use high contrast images for better edge detection
• Remove unnecessary background elements if possible
• Stick to simple color schemes for logos
• Crop out irrelevant parts of the image
• Save your file in a commonly supported format like PNG or JPG
Proper preparation ensures that when you vectorize an image, the final result is closer to your original intent and requires less manual correction afterward.
Step-by-Step Process to Vectorize an Image
The actual process of converting a raster image into a vector format can be done using various software tools, but the general steps remain similar.
First, import your image into a vector editing program. Most tools provide an “image trace” or “auto trace” feature that detects edges and shapes within the image. Once the image is loaded, you can adjust the tracing settings depending on the complexity of your design.
After tracing, the software converts the image into paths and shapes. At this stage, you will often need to refine the result manually. This includes cleaning up unnecessary anchor points, adjusting curves, and correcting uneven lines.
Once the basic structure is ready, you can:
• Adjust colors to match your branding
• Refine edges for smoother curves
• Separate elements for better control
• Group layers for easier editing
When you vectorize image designs properly, the final output becomes fully editable and scalable. This makes it extremely useful for logos and professional artwork that needs flexibility across different media.
Finally, save your file in vector formats such as SVG, AI, or EPS depending on your usage requirements.
Best Tools to Vectorize an Image for Professional Results
Choosing the right tool can significantly affect the quality of your vector output. Some tools offer automatic conversion, while others provide advanced manual control for designers who want precision.
Popular tools include:
• Adobe Illustrator for professional-grade vector editing
• CorelDRAW for detailed design and illustration work
• Inkscape as a free and open-source alternative
• Online converters for quick and simple vectorization tasks
Each tool has its strengths. Adobe Illustrator, for example, provides advanced tracing options and deep customization, making it ideal for branding projects. On the other hand, online tools are better suited for quick conversions when you do not need detailed adjustments.
If you are just starting, experimenting with different tools will help you understand how each one handles image conversion. Over time, you will develop a preference based on your design needs and workflow.
Common Mistakes to Avoid During Vectorization
While vector conversion is straightforward in theory, many beginners make mistakes that affect the final quality of their work. One common issue is overcomplicating the design during tracing. Too many anchor points can make the vector file messy and difficult to edit.
Another mistake is ignoring color limitations. Vector files work best with solid colors rather than complex gradients or photographic details. Trying to preserve too much detail from the original image often leads to poor results.
Other mistakes include:
• Using low-quality images as a starting point
• Over-relying on automatic tracing without manual cleanup
• Ignoring file optimization after conversion
• Not checking scalability across different sizes
Avoiding these errors ensures that your effort to vectorize an image produces clean, professional results suitable for branding and print production.
Practical Uses in Logos, Prints, and Branding
Vector graphics are widely used across industries because of their versatility. In branding, they ensure consistency across all marketing materials. A logo created in vector format can be resized for everything from mobile apps to outdoor advertising without losing clarity.
In printing, vector files are essential for producing high-quality results. Printers rely on clean, scalable files to maintain sharpness and color accuracy. This makes vector graphics ideal for posters, brochures, packaging, and merchandise.
Common applications include:
• Corporate logos and brand identity systems
• Business cards and stationery
• Large banners and billboards
• Custom merchandise like T-shirts and mugs
• Digital marketing assets
When designers vectorize image assets, they unlock flexibility that raster images simply cannot provide. This makes vectors a core part of professional design workflows.
Making Your Designs Ready for Real-World Use
Once your image has been successfully converted, the final step is preparing it for practical use. This involves checking file compatibility, optimizing size, and ensuring consistency across platforms.
You should test your vector file at different scales to confirm that it remains sharp and visually balanced. Also, consider creating multiple versions of your design for different use cases, such as monochrome versions for stamping or simplified versions for small screens.
It is also important to organize your design files properly. Keeping separate folders for original images, edited vectors, and final exports helps maintain a clean workflow, especially when working on multiple branding projects.
When you consistently apply proper techniques to vectorize image assets, your overall design quality improves significantly. This not only enhances visual appeal but also ensures your brand looks professional in every context.
